Leisure Battery Cable Size Guide (With Size Chart
Calculating your van’s ideal leisure battery cable size depends on how much electrical current (amps) you intend to draw from the batteries. The more amps you require, the thicker the wires must be. If the wire is too thin, the battery cable will get hot enough to burn through the insulation jacket and potentially create a fire.
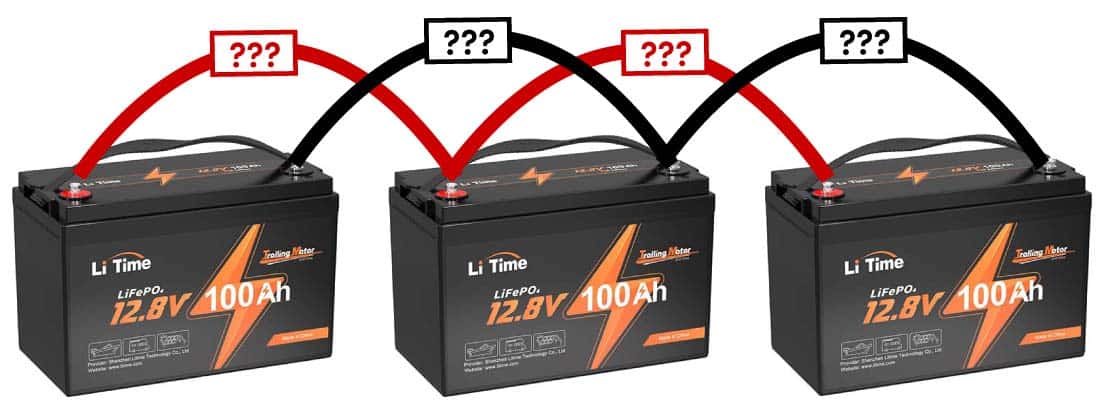
When calculating the size of the leisure battery cables, we prioritize safety above all else. We don’t want you to select a wire that is too thin, subsequently putting you and your electrical system at risk. That is why we take a systematic and conservative approach to help you find a cable size appropriate for connecting your leisure batteries.
Let’s get to it.

Disclosure: As an Amazon Associate, this site earns from qualifying purchases. Though we may earn a commission, the price you pay always remains the same.
Prioritize Quality Battery Cables
There are A TON of different battery cables sold online. Some of these wires are good quality, but some are questionable junk that use copper/aluminum hybrid conductors and cheap PVC jackets. We’re frustrated that many foreign manufacturers face no accountability for misleading marketing.
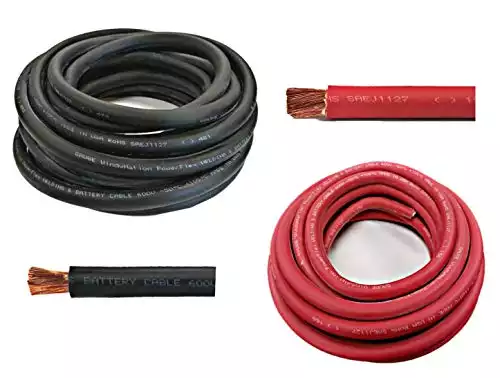
To keep this post simple and safe, we only recommend Windynation-branded battery cables. We love these wires in our camper van’s electrical system. Windynation is a US-based company, and every battery cable is made from 99.9% pure copper and is UL-certified for quality. Even down to the copper stranding extrusion, these cables are made in the USA. In other words, we trust their wire ampacity ratings, which, in turn, keep our solar system safe.
Scroll down to our appendix for more information on Windynation battery cable. (We have a lot more to share)
Battery Cable Size Calculator (Option 1: Preferred)
Introduction: This post provides two methods for calculating your ideal battery wire size: our preferred way and the “standard method.” Our method is more straightforward and SAFER (and we’ll explain why). Scroll down if you prefer the standard method.
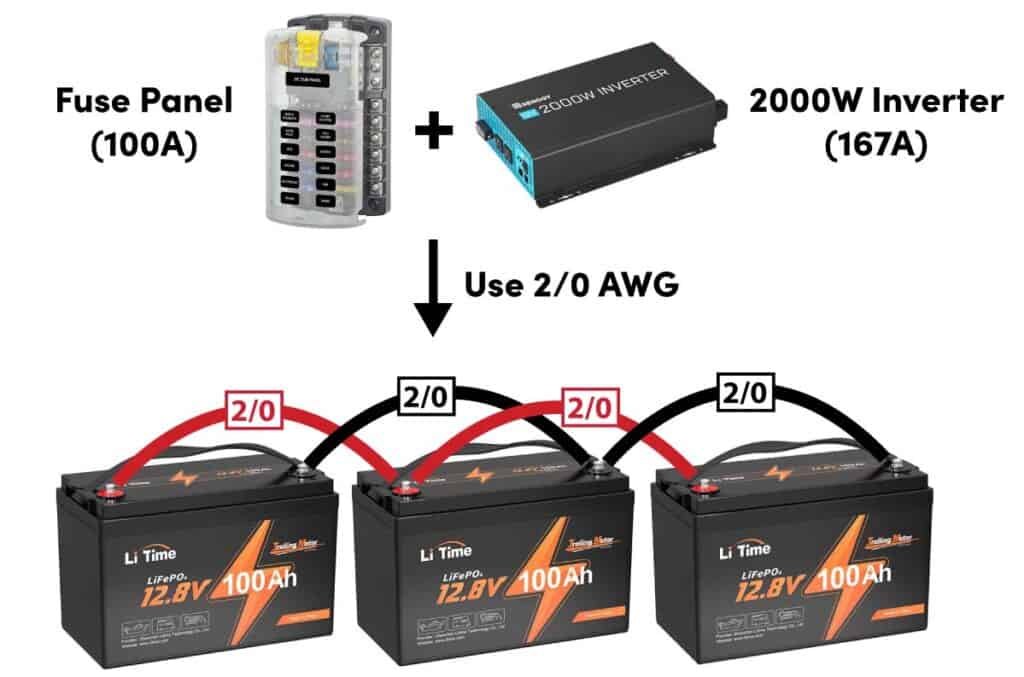
To ensure safety, your battery cables must accommodate the maximum current the electrical system can theoretically demand. For most systems, the two loads requiring power are the 12V fuse panel (DC devices) and the inverter (AC devices).
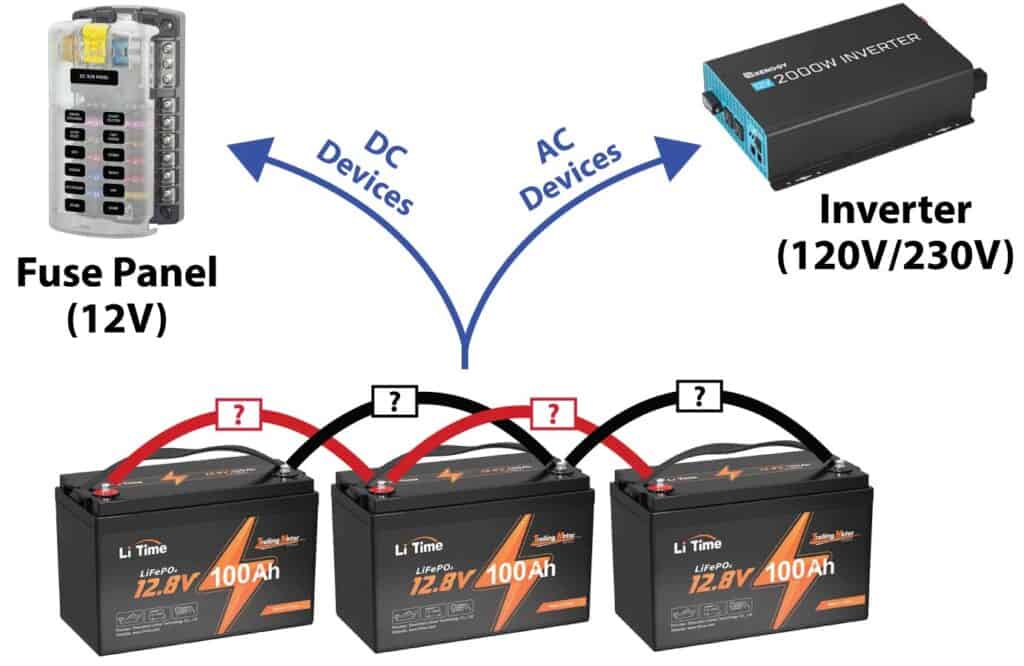
Therefore, the maximum current the battery cables will handle equals the sum of the fuse panel’s and inverter’s maximum operating current. We consider this a safer wire sizing solution than creating an itemized product list because this method allows you to power larger devices in the future without necessarily having to upgrade the battery cables.
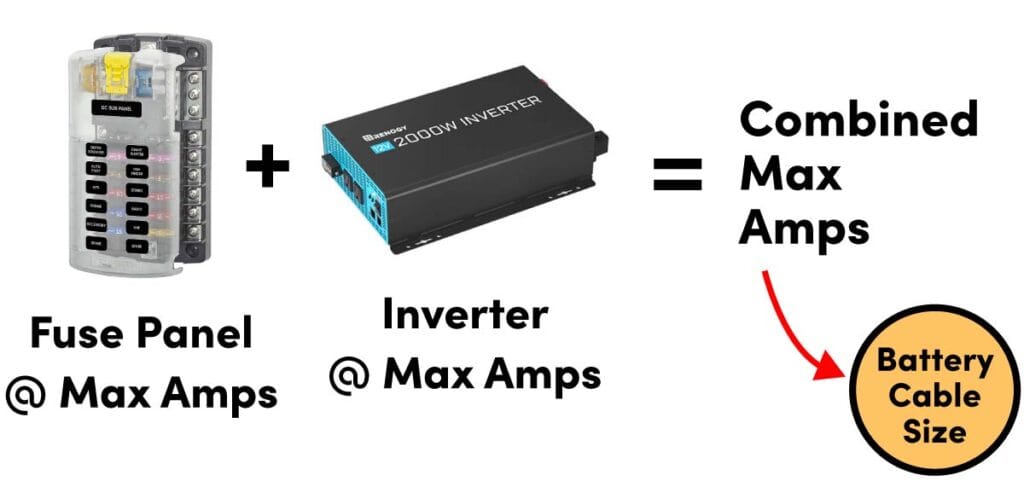
We recommend the following three steps to calculate the ideal battery cable size.
- Step 1: Determine max amps of the 12V fuse panel
- Step 2: Determine max amps of the inverter
- Step 3: Add max amps & select battery wire size
Step 1: Determine the amps Of the 12V Fuse Panel
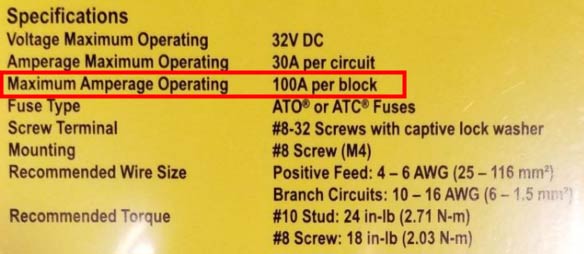
If you already have a fuse panel, check the user manual or product packaging for the panel’s maximum operating current. If you don’t yet have a fuse panel, we recommend Blue Sea System’s 12V fuse panel, which has a max current of 100 amps.
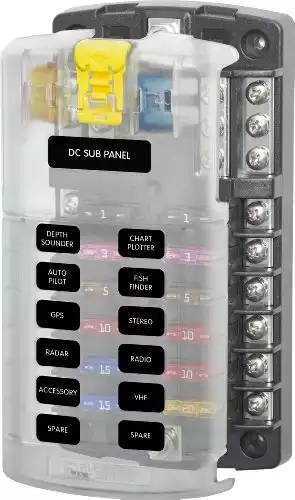
A 12V fuse panel is essential for distributing power from the leisure batteries to each 12V device. This panel accommodates up to 12 circuits with slots for blade fuses. The plastic cover with labels helps keep everything organized and safe.
This Blue Sea Systems fuse panel is listed as having a 100A maximum operating amperage on the back of the packaging.
Step 2: Determine the amps Of the Inverter
If you already have an inverter, take its wattage rating and divide it by your battery bank’s operating voltage to get the maximum amps. Reminder: Divide by the battery’s voltage (usually 12V or 24V) AND NOT the inverter’s output voltage (120V or 230V).
Example: A 2000W inverter is connected to a 12V battery bank, which demands 167A. (2000W / 12V = 167A).
The table below helps you locate your inverter’s maximum amp draw based on whether you are using a 12V or 24V battery bank. If you’re unsure, we recommend 12V, especially for first-timers.
| Inverter Wattage | Amps (@12V) | Amps (@24V) |
|---|---|---|
| 1000W | 83A | 42A |
| 2000W | 167A | 83A |
| 3000W | 250A | 125A |
Unsure what size inverter you need? Scroll down to use our quick inverter calculator.
Step 3: Add Max Amps and Select Battery Cable Size
Add the maximum operating amps together once you have your fuse panel and inverter. Refer to the table below to locate your recommended battery cable size. (Note: The below table assumes a 12V battery bank.)
| Inverter Size1 + 12V Panel2 | Max Amps | Wire Size3 |
|---|---|---|
| No Inverter + 100A | 100A | 2 AWG |
| 1000W (83A) + 100A | 183A | 1/0 AWG |
| 2000W (167A) + 100A | 267A | 2/0 AWG |
| 3000W (250A) + 100A | 350A | 4/0 AWG |
Table Footnotes:
1. Inverter watts/12V = Amps
2. Fuse panel specifications
3. Based on Windynation ampacity ratings
Example: Our camper van has a 12V fuse panel and a 2000W inverter. Therefore, we connect our three batteries using 2/0 AWG cables.
Below are our Windynation wire gauge recommendations based on your inverter wattage rating (mm² recommendations included).
|
No Inverter
|
1000W Inverter
|
2000 Inverter
|
3000 Inverter
|
|
35mm² |
55mm² |
70mm² |
120mm² |
More resources: Calculating the correct battery wire size is just the first step. Visit our other battery-related posts below.
- Leisure battery beginner’s guide
- How to crimp lugs onto battery cables
- Electrical system guide (for camper vans & RVs)
Battery Wire Size Calculator (Option 2: Standard)
Another way to calculate the correct battery cable size is to follow a more standard method. This comprises the following four steps.
Step 1: List Electrical Devices With Wattage Ratings
Make a list of all the electrical devices you intend to power from the batteries, including their wattage ratings. It doesn’t matter if they are DC or AC devices; just list the watts.
For all AC devices, increase the wattage rating by 10% to account for inverter power consumption.
Below is a sample table of the devices we run in our camper van. For the last four devices, we intend to power them with an inverter.
| Device | Wattage (W) |
|---|---|
| 12 LED Lights (3W each) | 36 |
| Ventilation Fan | 10 |
| Water pump | 50 |
| Fridge | 55 |
| Smartphone | 20 |
| Laptop (65 + 10%) | 72 |
| Instant Pot (800W + 10%) | 880 |
| Hair Dryer (1000W + 10% | 1100 |
| Blender (400W + 10%) | 440 |
Step 2: Sum The Wattages Of Devices Used Simultaneously
Next, think about which devices you might be running simultaneously that will draw the highest wattage from the batteries. For example, referring to the previous table, we may intend to run the following devices concurrently: LED lights, vent fan, water pump, fridges, smartphone, laptop, and hair dryer.
Sum the watts of all these devices. In our example, the total is 1,343 watts.
Step 3: Divide Max Watts By Battery Voltage
Take the maximum wattage draw you calculated in Step 2 and divide it by your battery’s operating voltage. The result is the maximum current (A) drawn from the batteries.
Example: 1,343W divided by 12V = 112A
Step 4: Multiply Amps By 125% (NEC Safety Factor)
For continuous currents, where the max current is expected to continue for three or more hours, the National Electric Code (NEC) requires you to take the amps you calculated in Step 3 and increase the figure by 25% (multiply by 1.25).
If you’re not sure whether your system will experience “continuous currents,” add the 1.25 safety factor anyway. It’s better to be safe than sorry.
Example: 112A * 1.25 = 140A
Step 5: Refer To Table For Battery Cable Size
Take the amps you calculated in Step 4 and locate your amp range in the table below (column 1). The recommended cable size is in column 2.
| Amp Range | Cable Size* |
|---|---|
| 150A (or less) | 4 AWG |
| 150A – 205A | 2 AWG |
| 205A – 285A | 1/0 AWG |
| 285A – 325A | 2/0 AWG |
| 325A – 440A | 4/0 AWG |
* Safety warning: Our battery cable size recommendations assume you are buying Windynation’s pure copper wires. We do not verify that these amp ranges are compatible with any other cables.
Why We Believe This Method Is Less Safe
Many other blogs will recommend this method for sizing your battery cables because it is technically correct. However, we do not feel this is safe in real life because this method does not factor in powering other electrical devices you didn’t previously consider. The battery wire size you would have is the perfect size for the EXACT system you have right now.
Example: Previously, we assumed that the 1100W hair dryer was the most significant power draw of the electrical system. But what if you later want to power a 1500W water kettle? This might demand more amps than your current battery cables can handle.
The future is always unknown, and users can make mistakes. That’s why we prefer using our battery wire sizing method. It removes user error from the equation and (to an extent) future-proofs your battery wires.
FAQ
For most electrical systems, 2/0 AWG battery cables are sufficient. This cable size pairs well with a 12V fuse panel and a 2000W power inverter. For a more nuanced size recommendation, it is better to understand how many amps you intend to draw from the batteries.
Upsizing battery cables has no negative consequences other than the increased financial cost of the wires. The benefit is that larger battery wires can safely transmit more amps, keeping your electrical system safe.
Battery cable size absolutely matters! Pushing too many amperes through too little a battery cable is a fire hazard. It is best practice to plan your power requirements in advance to calculate the ideal cable size for your system.
Though it is possible to use CCA battery cables, we do not recommend them. Copper-clad wires cannot conduct the same amount of electrical current as pure copper wires at the same gauge, which often means that CCA battery cables must be sized up compared to pure copper cables.
Conclusion
We hope you found this battery cable size calculator post helpful. Check out our battery size calculator if you do not know how many batteries you need.
For more information on van conversion, check out our van conversion guide, which has over 75 helpful build articles. When you’re ready to assemble your electrical and solar system, download our wiring diagram eBooks. They’re entirely free to use.
If you have any questions, please post a comment below.
Happy building!
Appendix
1. Windynation Battery Cables
Credible wire ampacity ratings are critical to us. If a battery cable cannot carry its listed current (A), this jeopardizes our electrical system (and camper van).
When we inquired with Windynation regarding their battery cable ampacity ratings, we received the below reply:
“Attached is our Certificate of Conformance for our cable. The ampacity is indeed continuous in open air” (max current for 3+ hours in room temp).
Windynation Support Staff

Their certificate of compliance is the perfect resource because it verifies Windynation’s battery wire ampacity ratings in a continuous current environment instead of relying on a generic third-party table encompassing many different wire grades.
Windynation says its battery cables are “100% made in the USA.” When we asked what this means specifically, this was their reply.
“The cable uses copper mined in Canada and is indeed extruded / stranded in the USA. The copper strands are bundled and wrapped in a paper separator that is then encapsulated in an EPDM rubber jacket…The cable follows the specifications for the National Electric Code (NEC) Article 630 for electric welders.
Windynation Support Staff
2. Inverter Size Calculator
Below is a simple calculator that can help you quickly determine what inverter size and type you need without any math calculations. Just answer a few questions, and the calculator will recommend a budget and premium inverter.

Van Conversion Essential Bundles
Every resource on our website is 100% free to download and use. We don’t charge you, and we don’t require your email address. Happy building!